Showing posts with label tutorial. Show all posts

Sunday, December 29, 2013

New Year's Eve Party Tags!

Hi everyone! Today I am Featured Designer on the Spellbinders® Paper Art blog and I am showing you how to create with the Imperial Gold Enhancing Elements die templates. Hop over to the blog and learn a little bit more about me and enter to win ALL of the fabulous dies I've used in my project!

I've created a fun Bottle and Wine Glass tag for your New Year's Eve Party. You'll find all the supplies listed below and a full tutorial. To enter to win ALL the dies I used in my projects, click HERE!! Don't forget to become a follower and subscribe to my YouTube channel!

Pin It
Share this on Pinterest!


Project Recipe:
 
Instructions:
 
  • Cut/emboss Classic Squares LG #5 (with #1 being the smallest) with olive cardstock. 
  • Nest Gold Squares One #3 inside Classic Scalloped Squares LG #3 (use washi tape or low-tack tape to secure) and cut/emboss with white cardstock. 
  • Nest Gold Squares One #1 inside Classic Squares LG #2 and cut/emboss with olive cardstock.
  • With Classic Square #2/Gold Squares One #1 die cut in template, stencil with Olive Grove ink with a sponge dauber. 
  • With Classic Scalloped Square #3/Gold Squares One #3 die cut in template, stencil with Olive Grove ink with a sponge dauber.
  • Add 3D Foam dots to small square die cut and adhere to large square die cut.
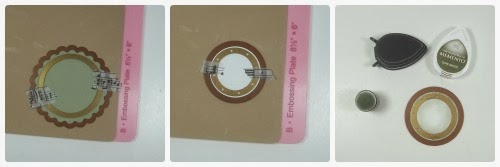
  • Nest Gold Rounds One #4 inside Classic Scalloped Circles #4 and cut/emboss with olive cardstock.
  • Nest Gold Rounds One #3 inside Standard Circles #3 and cut/emboss with white cardstock
  • With Gold Rounds One #3/Standard Circles #3 die cut in template, stencil with Olive Grove ink with a sponge dauber.
  •  Adhere both die cuts on top of each other.
  • Cut/emboss Standard Circles #1 in center of large scalloped die cuts.
  • Cut from the outer scalloped edge to the center for your wine glass tag.
  •  Stamp "Happy New Year" with Tuxedo Black ink on white cardstock panel, roll against a pencil for your banner sentiment.
  • Add black rhinestones to your Bottle Tag and Wine Glass Tag.
  • Adhere your sentiment banner to the large tag, then add 3d foam dots to the back and affix to your wine bottle.

Thursday, October 24, 2013

Thomas Turkey...

Have you seen my darling Thomas Turkey Utensil Holder on the Spellbinders® blog yet? Yes, I did use the 2010 Heirloom Ornament for his face! There's a full tutorial on how to make him! ~ Enjoy!

Pin It
Share this on Pinterest!

Monday, March 19, 2012

JustRite Fan Tutorial...

As promised, I have created a tutorial for the JustRite Stamps Fan card I made HERE! The fan wow'd so many of you and the emails I received for a tutorial was amazing! I appreciate everyone's kind comments about my fan as I love getting love from you!!!

This tutorial is photo intensive, as I show you not only how to make the fan but the card as well! Please click on the images to see them at full size to follow along with the instructions. (To do this simultaneously, right click on the image, then Open in New Window or Tab)

As a special treat, I am offering the Fan Card I created for this tutorial for a Prize!! Comment on this post and I will pick a random winner on Monday, March 26th. Please watch for the Winner announcement that day!! SPECIAL NOTE: You can email your comment to me if you prefer!

Pin It
Share this on Pinterest!

 JustRite Fan Tutorial

I will list the supplies I used for my card, but you can substitute with items in your stash! Of course, I encourage you to purchase the JustRite Stamps as they are perfect for this technique :)

Supplies:

Paper: K & Company Classic K Bailey, Ivory and Light Teal/Blue Cardstock
Ink: Versamark, Memento Tuxedo Black
Embossing Powder: Ranger Seafoam White
Accessories: May Arts Light Blue 1.25 inch Silk Ribbon, Recollections White Pearls, Copic Markers BG01 and BG10, Decorative Stick Pins, Recollection Rose
Tools: Martha Stewart Score Board, Heat Gun, Scissors, Liquid Glue (I used Beacon Adhesives 3-in-1 Glue), Embossing Stylus or Pencil, Corner Rounder Punch, Decorative Corner Punch

Getting Started:

1. Cut Patterned paper 5 1/4 x 4 3/4 inches and punch the upper right corner with your favorite decorative corner punch.
2. Cut Ivory cardstock 5 x 5 1/2 inches and round the upper right corner with a Corner Rounder punch. Adhere your patterned paper to this piece. Cut the Teal/Blue cardstock 6 x 12 inches and fold. Round the upper right corner with the Corner Rounder punch (front and back). Adhere your panel to your card.
3. Tie two bows with May Arts Silk Ribbon, one larger than the other.
4. Color 12 large white pearls and 8 smaller pearls with Copic Marker BG01.

Step 1 instructions:

1. Stamp two Scrolled Vine Background on Ivory cardstock with Versamark, then emboss with white embossing powder, using your heat gun. 
2. Once cool, cut the stamped images out. (You can use any background stamp for your fan, but make sure your pieces are sized 2 1/4 x 4 1/2 inches) You need three pieces. (Save the other piece for another card)
3.Score each piece in 1/2 inch increments. (1/2, 1, 1 1/2, 2, 2 1/2, 3, 3 1/2, 4 inches)
4. Fold each piece alternating between mountain and valley folds. (You should have 4 mountains and 4 valleys.)
5. Glue one end of the folded piece to another, as shown in the photo.
6. Glue the last piece to the second piece, as shown in the photo.
7. Using the photo as a guide, cut a small piece from the folded strip. This is so the piece is balanced.


Step 2 instructions:

1. Stamp 3 Lace Borders with Versamark on Ivory cardstock, then emboss with white embossing powder.
2. Cut the Lace Borders as shown, which will give you 12 pieces.
3. Fold each piece in half.
4. Glue one folded piece on the edge of the folded strip.
5. Glue all pieces and allow to dry thoroughly.
6. Turn folded strip over and apply a generous amount of glue to each fold.
7. Glue down onto your card, pinching the bottom ends to form the fan. While the glue is still setting, you can arrange each fold until you are please with it.


Step 3 instructions:

1. Stamp 1 Lace Borders with Versamark and emboss with white embossing powder.
2. Cut three pieces from the lace borders, using the photo as your guide. 2 pieces should have 3 upper loops and 1 should have 5 upper loops.
3. Glue the 2 smaller pieces to the bottom curved edge of the fan, as shown.
4. Glue the larger piece in the middle of the two smaller pieces, as shown.
5. Trim edges to the fan sides.


Adding Pearls, Bows and Rose instructions:

1. Add colored pearls, as shown.
2. Glue the larger bow to the bottom of fan, as shown.
3. Glue the smaller bow on top of the larger bow, as shown.
4. Adhere rose to middle of bow. (Edge of rose should be overlapping the looped pieces from Step 3.


Sentiment tag and finishing instructions:

1. Cut ivory strip 1/2 x 2 3/4 inches and stamp sentiment in the center with Memento Tuxedo black ink. Using a square punch, insert strip into corner of the square and punch to make a ribbon end.
2. Outline sentiment edge with Copic marker BG01, then soften with BG10.
3. With embossing stylus or pencil, curve sentiment piece, as shown.
4. Adhere to fan by inserting the left end of sentiment strip under the rose.
5. Add decorative pearls between each fan piece on card.
6. Insert decorative stick pins into bow.

If you have any questions, please feel free to contact me!! Don't forget to leave a comment for your chance to win the Fan card!!