
Hi everyone! Today I am Featured Designer on the Spellbinders® Paper Art blog and I am showing you how to create with the Imperial Gold Enhancing Elements die templates. Hop over to the blog and learn a little bit more about me and enter to win ALL of the fabulous dies I've used in my project!
I've created a fun Bottle and Wine Glass tag for your New Year's Eve Party. You'll find all the supplies listed below and a full tutorial. To enter to win ALL the dies I used in my projects, click HERE!! Don't forget to become a follower and subscribe to my YouTube channel!


Share this on Pinterest!


Project Recipe:
Dies: Spellbinders® Paper Arts S4-412 Gold Rounds One #3 and #4, S4-114 Standard Circles LG #1 and 3, Classic Scalloped Circles #4, S4-410 Gold Squares One #1 and #3, S4-126 Classic Squares LG #2 and #5, S4-127 Classic Scalloped Squares LG #3
Embellishments: Black/Ivory Gingham from The Stamp Simply Ribbon Store, KaiserCraft Black Rhinestones, Beacon Adhesives, Scrapbook Adhesives by 3L™ 3D Foam Dots
Instructions:
- Cut/emboss Classic Squares LG #5 (with #1 being the smallest) with olive cardstock.
- Nest Gold Squares One #3 inside Classic Scalloped Squares LG #3 (use washi tape or low-tack tape to secure) and cut/emboss with white cardstock.
- Nest Gold Squares One #1 inside Classic Squares LG #2 and cut/emboss with olive cardstock.
- With Classic Square #2/Gold Squares One #1 die cut in template, stencil with Olive Grove ink with a sponge dauber.
- With Classic Scalloped Square #3/Gold Squares One #3 die cut in template, stencil with Olive Grove ink with a sponge dauber.
- Add 3D Foam dots to small square die cut and adhere to large square die cut.
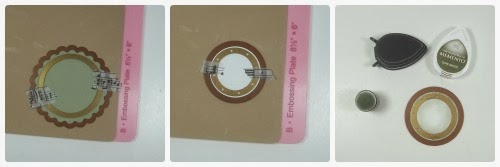
- Nest Gold Rounds One #4 inside Classic Scalloped Circles #4 and cut/emboss with olive cardstock.
- Nest Gold Rounds One #3 inside Standard Circles #3 and cut/emboss with white cardstock
- With Gold Rounds One #3/Standard Circles #3 die cut in template, stencil with Olive Grove ink with a sponge dauber.
- Adhere both die cuts on top of each other.
- Cut/emboss Standard Circles #1 in center of large scalloped die cuts.
- Cut from the outer scalloped edge to the center for your wine glass tag.
- Stamp "Happy New Year" with Tuxedo Black ink on white cardstock panel, roll against a pencil for your banner sentiment.
- Add black rhinestones to your Bottle Tag and Wine Glass Tag.
- Adhere your sentiment banner to the large tag, then add 3d foam dots to the back and affix to your wine bottle.
Wonderful instructions Darsie and love the tags.
ReplyDeleteI like this idea. It will probably be just my DH and I for New Year's Eve but this would make it a little more celebratory!! Thanks, Darci!
ReplyDeleteVery cool!
ReplyDeleteDarsie what a great idea and wonderful for New Years Eve entertainment.
ReplyDeleteHugs Trish.
FABULOUS tags for New Year's Eve gifting, Darsie! Hope it's a great New Year for you!!!
ReplyDeleteChic and smart looking. The olive and white look fabulous together. Great project, thank you.
ReplyDeleteLovely what a nice idea perfect for the season
ReplyDeleteA really beautiful set, that´ll decorate on any festive table that´s for sure. I love how you´ve mixed both 3 of the brand new and 3 of the very old diesets, and showed how well they all work together, as many forget a bit about the old ones and only concentrate on the newest dies.
ReplyDeleteHave a very Happy New Year to you and your family, hope you´ll have a wonderful party.
Great idea! In different colors everyone would remember their glass...love it!
ReplyDeleteSuch a creative use of the dies Darsie. I love the fact that you created something both beautiful and functional.
ReplyDeleteFantastic idea. :D I like the win glass tag with the bottle tag perfect combo to ring in the new year. :D
ReplyDeleteThank you
Deborah
The quality of your research really shows in this post. I appreciate the effort and expertise behind it.Buy Property in gwalior
ReplyDeletereat content! The points are clear and well explained.digital marketing services in gwalior
ReplyDelete